
image flask

Experimental Procedures


Safety

PART A: Synthesis of p-methylacetanilide 1

  1. In a 25 mL Erlenmeyer flask, dissolve 6.45 g of sodium acetate trihydrate (CH3COONa·3H2O) in 18 mL of distilled water (dH2O). Sodium acetate acts as a buffer during the reaction. The acetate ion also acts as a base in a deprotonation step in the mechanism. 
  2. Stir vigorously until all the crystals have dissolved.
  3. Place the solution aside for later use. 
  4. Grind some p-toluidine with a mortar and pestle. Add 4.83 g of ground p-toluidine to a 500 mL Erlenmeyer flask. Add a magnetic stir bar and 120 mL of dH2O.
  5. While stirring, add 3.9 mL of concentrated hydrochloric acid. 
  6. Mix vigorously with the magnetic stir bar for two (2) minutes. Once all the p-toluidine has dissolved, verify the pH with a strip of pH indicator paper. If an insoluble brown impurity remains, remove it by gravity filtration.
  7. While continuing to stir, add 6.3 mL of acetic anhydride. Quickly verify the pH.  Immediately add the sodium acetate trihydrate solution previously prepared. Verify the pH once again.
  8. Stir vigorously to mix the reactants.
  9. Maintain vigorous stirring while the solution is cooled in an ice bath and crystallization is occurring (15 min.). 
  10. While cooling, prepare the TLC setup (developing chamber, mobile phase, stationary phase, standard solutions).
  11. After cooling the product, collect it by vacuum filtration. Wash the crystals with small portions of ice-cold dH2O.
  12. Verify the purity of the product by TLC only. It is not necessary to let the product dry before preparing the TLC solution. 
  13. Allow product to dry during the week.
  14. Weigh the product.
  15. The rest of the product may be used in the next step without purification.
Analysis of p-methylacetanilide

PART B: Synthesis of p-acetamidobenzoic acid 1

  1. Prepare a solution of potassium permanganate by dissolving 12.0 g of KMnO4 in 100 mL of hot water. Swirl to dissolve.
  2. Place the solution aside, cover it with a watch glass and keep it hot on a hot plate for later use.
  3. The p‑methylacetanilide left over from the first step, must be ground with a mortar and pestle before being weighed for this step.
  4. To a 500 mL Erlenmeyer flask equipped with a magnetic stir bar, add 5.5 g of p‑methylacetanilide, 14.5 g of magnesium sulfate heptahydrate (MgSO4· 7H2O) and 300 mL of water. The magnesium sulfate acts as a basic buffer during this  reaction. 
  5. Heat with stirring to 85°C on a hot plate.
  6. While vigorously stirring the solution of p‑methylacetanilide, slowly add the warm solution of potassium permanganate with a plastique pipet (3mL). The addition should take approximately 30 minutes.  It is very important to add the permanganate solution slowly and uniformly to avoid local build-up of the oxidant.
  7. After all the oxidant has been added, stir the solution vigorously for five (5) minutes.
  8. Add 20 mL of ethanol to react with the excess oxidant.
  9. Then, boil the solution until the dark mauve colour is dissipated. It is important to closely watch the boiling solution because it can very easily overflow.
  10. To separate the brown manganese dioxide from the solution containing p‑acetamidobenzoic acid, place a 1 cm layer of diatomaceous earth (Celite) on the filter paper of a vacuum filtration setup. Do not forget to wet the filter paper with a small amount of dH2O before placing the layer of Celite on it. 
  11. Wash the brown precipitate with hot water to dissolve adsorbed product.
  12. If the filtrate is still violet-coloured, add 5 mL of ethanol, boil and refilter.
  13. Cool the filtrate in an ice bath and acidify with 20% sulphuric acid until the pH is 3-4.
  14.  Allow crystallization to occur for 20 min in the ice bath.
  15. Collect the product by vacuum filtration, rinsing the crystals with small amounts of ice-cold dH2O.
  16. Dry the crystals as much as possible by continuing suction.
  17. Verify the purity of the product by TLC only.
  18. The rest of the wet product may be used in the next step without purification.
  Analysis of p-acetamidobenzoic acid

PART C: Synthesis of p-aminobenzoic acid 1

  1. In a 50 mL round-bottom flask, weigh 3 g of p-acetamidobenzoic acid.
  2. Add a magnetic stir bar and 15 mL of 6 M HCl.
  3. Set up a reflux apparatus as shown in Figure 6 below.
  4. Begin stirring and heating slowly.  Reflux for 30 minutes.  Observe.
  5. After the heating time is over, let the reaction mixture cool to room temperature. Continue to stir the reaction mixture and leave the condenser with circulating water in place. 
  6. Add 7.5 mL of cold distilled water and mix before verifying the pH.
  7. Then add 14 M aqueous ammonium hydroxide dropwise, until the pH is just slightly basic (pH = 7-8). To do so, add 50 drops of NH4OH, mix and verify the pH. Repeat this two (2) more times for a total of 150 drops of NH4OH.
  8. Now add the NH4OH more slowly, for example by portions of 10 drops before verifying the pH.  It will take 200 drops or more for the NH4OH to neutralize the mixture.  Do not go past pH 8.
  9. Add 1.5 mL of glacial acetic acid.
  10. Stir vigorously and cool the solution in an ice bath.  It may be necessary to induce crystallization by scratching the side of the round-bottom flask with a glass rod.
  11. Isolate the crude product by vacuum filtration using a small Büchner funnel. Wash the crystals with small portions of ice-cold dH2O.
  12. Allow the crystals to dry and weigh them.  If performing a recrystallization immediately, weigh wet crystals.
  13. Save about 10 mg of crude product for the TLC analysis.
  14. Recrystallize the crude product from water on a hot plate.  If there are insoluble impurities, remove them with hot gravity filtration. If crystals are colored, decolorize using charcoal.
  15. Analyze PABA using the four (4) analytical methods provided below.
Analysis of p-aminobenzoic acid

ALWAYS make sure the hoses are securely attached to the condenser. A gentle flow of cooling water is all that is needed.  Check for leaks!
 
Organic chemists often need to heat a mixture for a long time and to be able to leave it relatively untended. The "reflux apparatus" shown allows such heating; it allows the reaction to be carried out at the boiling point of the solvent and yet it prevents loss of solvent or reagent due to evaporation. A condenser is attached to the boiling flask and is clamped in an upright position, the "reflux position," and cooling water is circulated to cause the vapours to condense as they rise up the condenser and thus prevent them from escaping. The upper level of the vapours in the condenser can often be seen as a reflux line. The direction of flow of the water should be such that the condenser will fill with the cooling water; water should enter the condenser at the bottom and leave from the top.  It is usually a good idea to ensure that the heating mantle can easily be removed by using a laboratory jack.
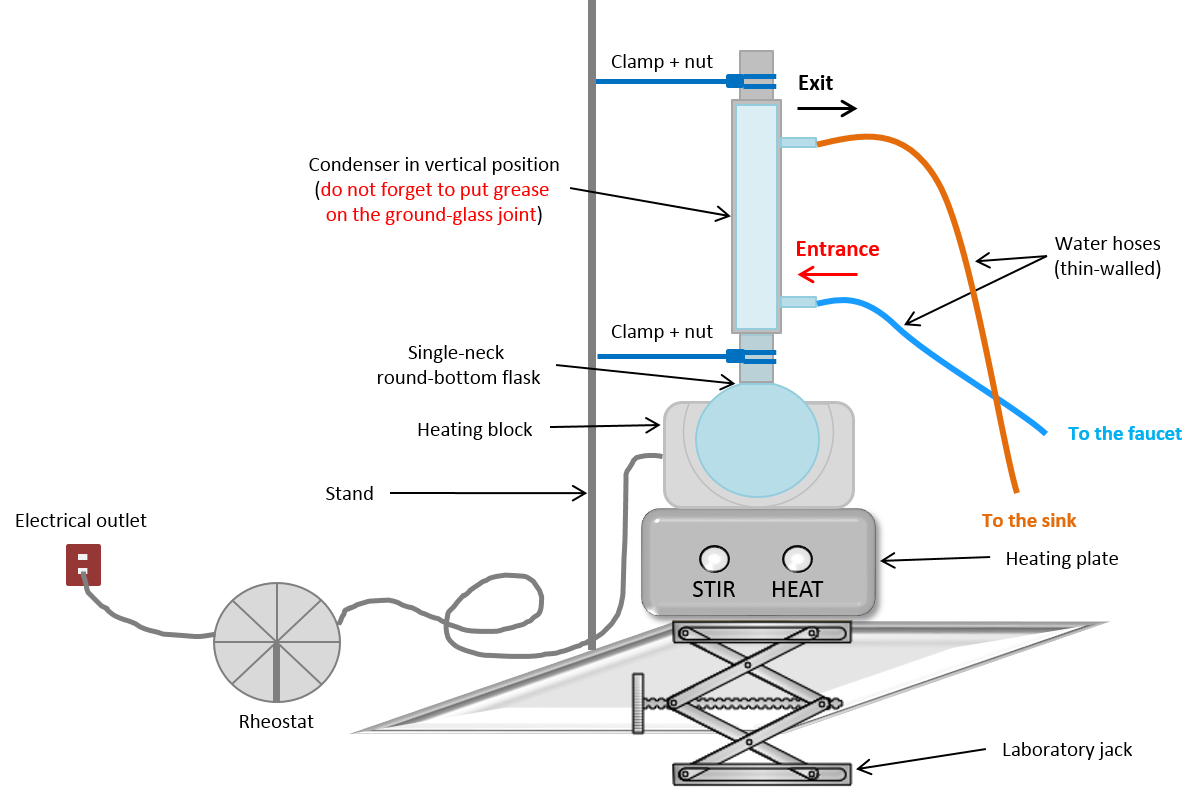
reflux setup
Video


Figure 6. Reflux setup for the synthesis of p-aminobenzoic acid and video

Preparation of a sunscreen2

To minimize the risk of contamination during the preparation of cosmetic products (except in the synthesis of soap), it is important to sterilize the work surface, the utensils and the containers that will hold the cosmetic product.  In addition, you must wash your hands very well before beginning the synthesis (you may also wear gloves).  To sterilize the work surface, spray it with 70% aqueous ethanol.  When using 70% aqueous ethanol, it is important to let it completely evaporate before using the surface, the utensils or the containers.  As for the utensils and containers, make sure they are clean by washing them with soap and hot water.  Next, sterilize the utensils and containers by placing them in boiling water for 5 minutes, by placing them in an oven at 120oC for 20 minutes, or by spraying them with 70% aqueous ethanol.  To sterilize plastic containers, let them soak in water that has just come to a boil for 10 minutes, or spray them with 70% aqueous ethanol.  Use tweezers to remove utensils and containers from boiling or almost-boiling water.  Let all utensils and containers dry and cool to room temperature before use.
 
A cream base, also called the excipient, is obtained when two phases: an aqueous phase, an oil phase mixed together in the presence of an emulsifying agent to form an emulsion.  The word excipient originates from the Latin “excipere,” which means, “to receive”; hence, the excipient receives the active substance.  Active ingredients may, therefore, be added to the cream base.  For example, lavender essential oil may be added to give the cream an anti-inflammatory and anti-aging property.  Lavender essential oil is also said to have a relaxing effect, thus relieving stress and anxiety. 
 
The excipient will be made using the quantities presented in Table 1 below.
  1. Choose your aqueous phase and your oil phase.  Note that the oil phase may be composed of only one oil (ex. 36 g of sunflower oil) or a combination of oil and butter (ex. 30.5 g of sunflower oil and 5.5 g of shea butter). Likewise, you may choose only one aqueous phase (ex. 100 g of hydrosol) or a combination of aqueous phases (ex. 50 g of hydrosol and 50 g of aloe Vera juice).
  2. To a 400 mL beaker add 36 g of the oil phase, 5 g of stearic acid and 10 g of emulsifying wax, taring the beaker in between each addition.
  3. To obtain a homogeneous mixture, heat gently to about 50oC on a bain-marie until the emulsifier is melted, and the stearic acid has dissolved.  Do not swirl or stir the reactants during the melting process.
  4. Meanwhile, in a 200 mL beaker, weigh 1.5 g of GeoGard Ultra.  Add 100 g of the aqueous phase and heat to about 35oC.  Maintain at this temperature.
  5. At this point, if you wish to prepare a sunscreen, add 24 g of zinc oxide (ZnO) to the oil phase (you may also add less ZnO, for example 12 g). Blend well with the mini-mixer equipped with the stir attachment. However, you may omit zinc oxide if you wish to just prepare a rich nourishing cream.
  6. Once the zinc oxide has been completely mixed into the oil phase, work quickly to begin the addition of the aqueous phase. Slowly add the aqueous phase to the oil phase mixing vigorously with the mini-mixer equipped with the stir attachment.  
  7. Once a smooth cream-like consistency is obtained, add 3 drops of vitamin E (antioxidant).  Incorporate well with the mini-mixer.
  8. Next you may add an active ingredient from the list in Table 1 in the project handout document.
  9. Place in sterilized labelled containers.
  10. Let the cream cool completely before closing the containers to avoid contamination by water that may condense inside the sealed container.  Bacteria need water to proliferate!
  11. Use the cream within 6 months.
Table 1. Quantities of the aqueous and oil phases and the emulsifying agent to make the excipient (cream base)

Ingredients Quantity Choices % variation
Excipent Aqueous phase
100 g
  • Hydrosol of rose, lavender, chamomile or calendula
  • Aleo vera juice
60-80 %
Oil phase
36 g
  • Sunflower oil (base)
  • Olive oil (base)
  • Shea butter (5.5 g)
  • Cacao butter
10-25 %
Emulsifiers
Stearic acid
Emulsifying wax

5 g
10 g

3-10 %
TOTAL
151 g


Preservatives
GeoGard ultra (antibacterial + antifungal)
Vitamin E (antioxidant)

1.5 g
3 drops


Active ingredients

a few drops
  • Essential oils and flavours (bergamot, coconut, lavender, lemongrass, peppermint, sandalwood, spring flowers, vanilla)

24 g w/w (SPF approx. 20) or less
  • Sun barrier - ZnO


References

  1. Schoffstall AM, Gaddis BA, Druelinger ML.  Microscale and Miniscale Organic Chemistry Laboratory Experiments. 2e éd. Montréal: McGraw Hill Higher Education; 2004. Chapter 27, Amino Acids and Derivatives; p. 518-528
  2. Fortin S. Cosmétiques non toxiques.  Montréal (QC), Canada : Les Éditions La Presse; 2016