Image

Part 3. Analysis of Aspirin


Schedule

Detailed schedule and instructions for the prelab, the lab report and the required reading
This schedule is unofficial and subject to modifications.
PrelabReport
Instructions
+
Supplementary information
EvaluationRequired Reading - to be done before the experimentInstructions
+
Information
Evaluation
Lab Manual
by Turkewitsch
Lab Textbook
Macroscale and Microscale Experiments
5th edition by Williamson
First-year chemistry textbook
Chemistry:  The Central Science
13th edition by Brown, LeMay and Bursten
Part 3. Analysis of aspirine by melting point and qualitative chemical analysis

After having read the required reading given in this table and the procedure provided below, prepare a prelab as follows:

1. Prepare data tables following the example in the Chemistry Guide.

2. Provide the reaction for the positive test using salicylic acid.  Cite your sources.

Prelab for Part 3 will be marked before the beginning of the lab session.
Section - Lab notebook & prelab assignment provides information on how to prepare your prelab

Sub-section - Flow diagram provides a detailed description of a flow diagram.
Chapter 3 - Melting points and boiling points 
Please note that you must be able to draw the different types of intermolecular forces.

Chapter 11 Intermolecular forces - Reread section 11.2 Intermolecular forces.
Hand in the report sheet at the beginning of the next lab period or one week after the lab work has been completed.Lab Report Sheet -
Analysis of aspirin


Safety Cleanup and disposal

All solutions and mixtures are to be placed in the designated waste receptacle for that purpose. Under no circumstances are the solutions or mixtures to be flushed down the drain.  If you are unsure of how to handle a solution, ask your professor or the lab technician.  Throw used rinsed test tubes in the glass waste box.


Experimental procedures

The following analytical methods will be used to analyze the crude and the recrystallized aspirin: melting point and a qualitative chemical test.  During the analysis keep in mind that you wish to determine whether aspirin was actually synthesized, and, if so, you wish to know if it contain impurities. 

Analytical Method 1. Melting Point Determination


The following procedure has been modified from that given in Experiment 2 (page 52) of Chapter 3 Melting Points and Boiling Points in Macroscale and Microscale Experiments by Williamson.1

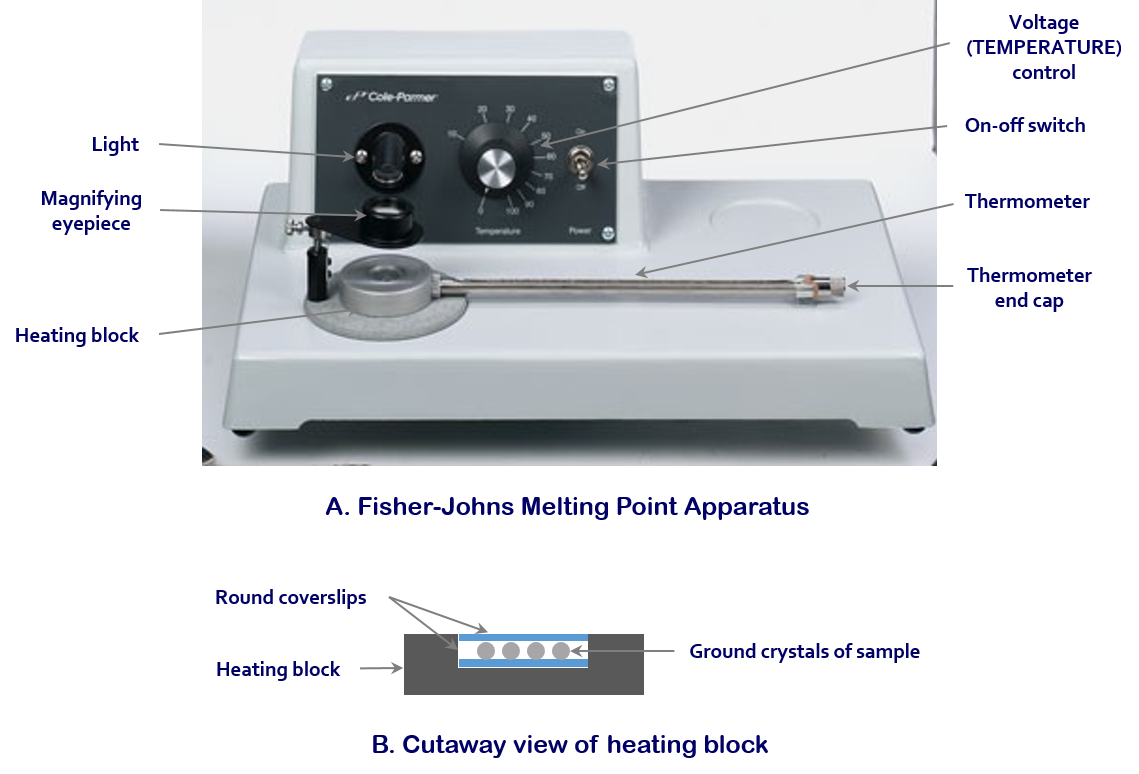
  1. The Fisher-Johns melting point apparatus will be used to determine the melting point (see Figure 1 below).
  2. Obtain the melting point of recrystallized aspirin, as well as a standard sample of aspirin.
  3. Using a mortar and pestle, grind a small amount of sample into a fine powder.
  4. Place a coverslip onto the heating block of the Fisher-Johns melting point apparatus.  Using a microspatula place a very small amount of crystals on the coverslip and cover the crystals with another coverslip (see Figure 1B).  Gently press the two coverslips together with the tip of your finger to spread the crystals out into a thin layer.
  5. Place the magnifying eyepiece over the heating block to be able to clearly see your sample.
  6. Turn on the instrument.
  7. Turn the voltage (temperature) control dial to increase the temperature of the heating block.  Note: the higher the setting, the faster the temperature will rise.  The heating block will be preheated to about 100-120°C.  Heat slowly so that the temperature rises by 1°C per minute around the melting point of the sample. 
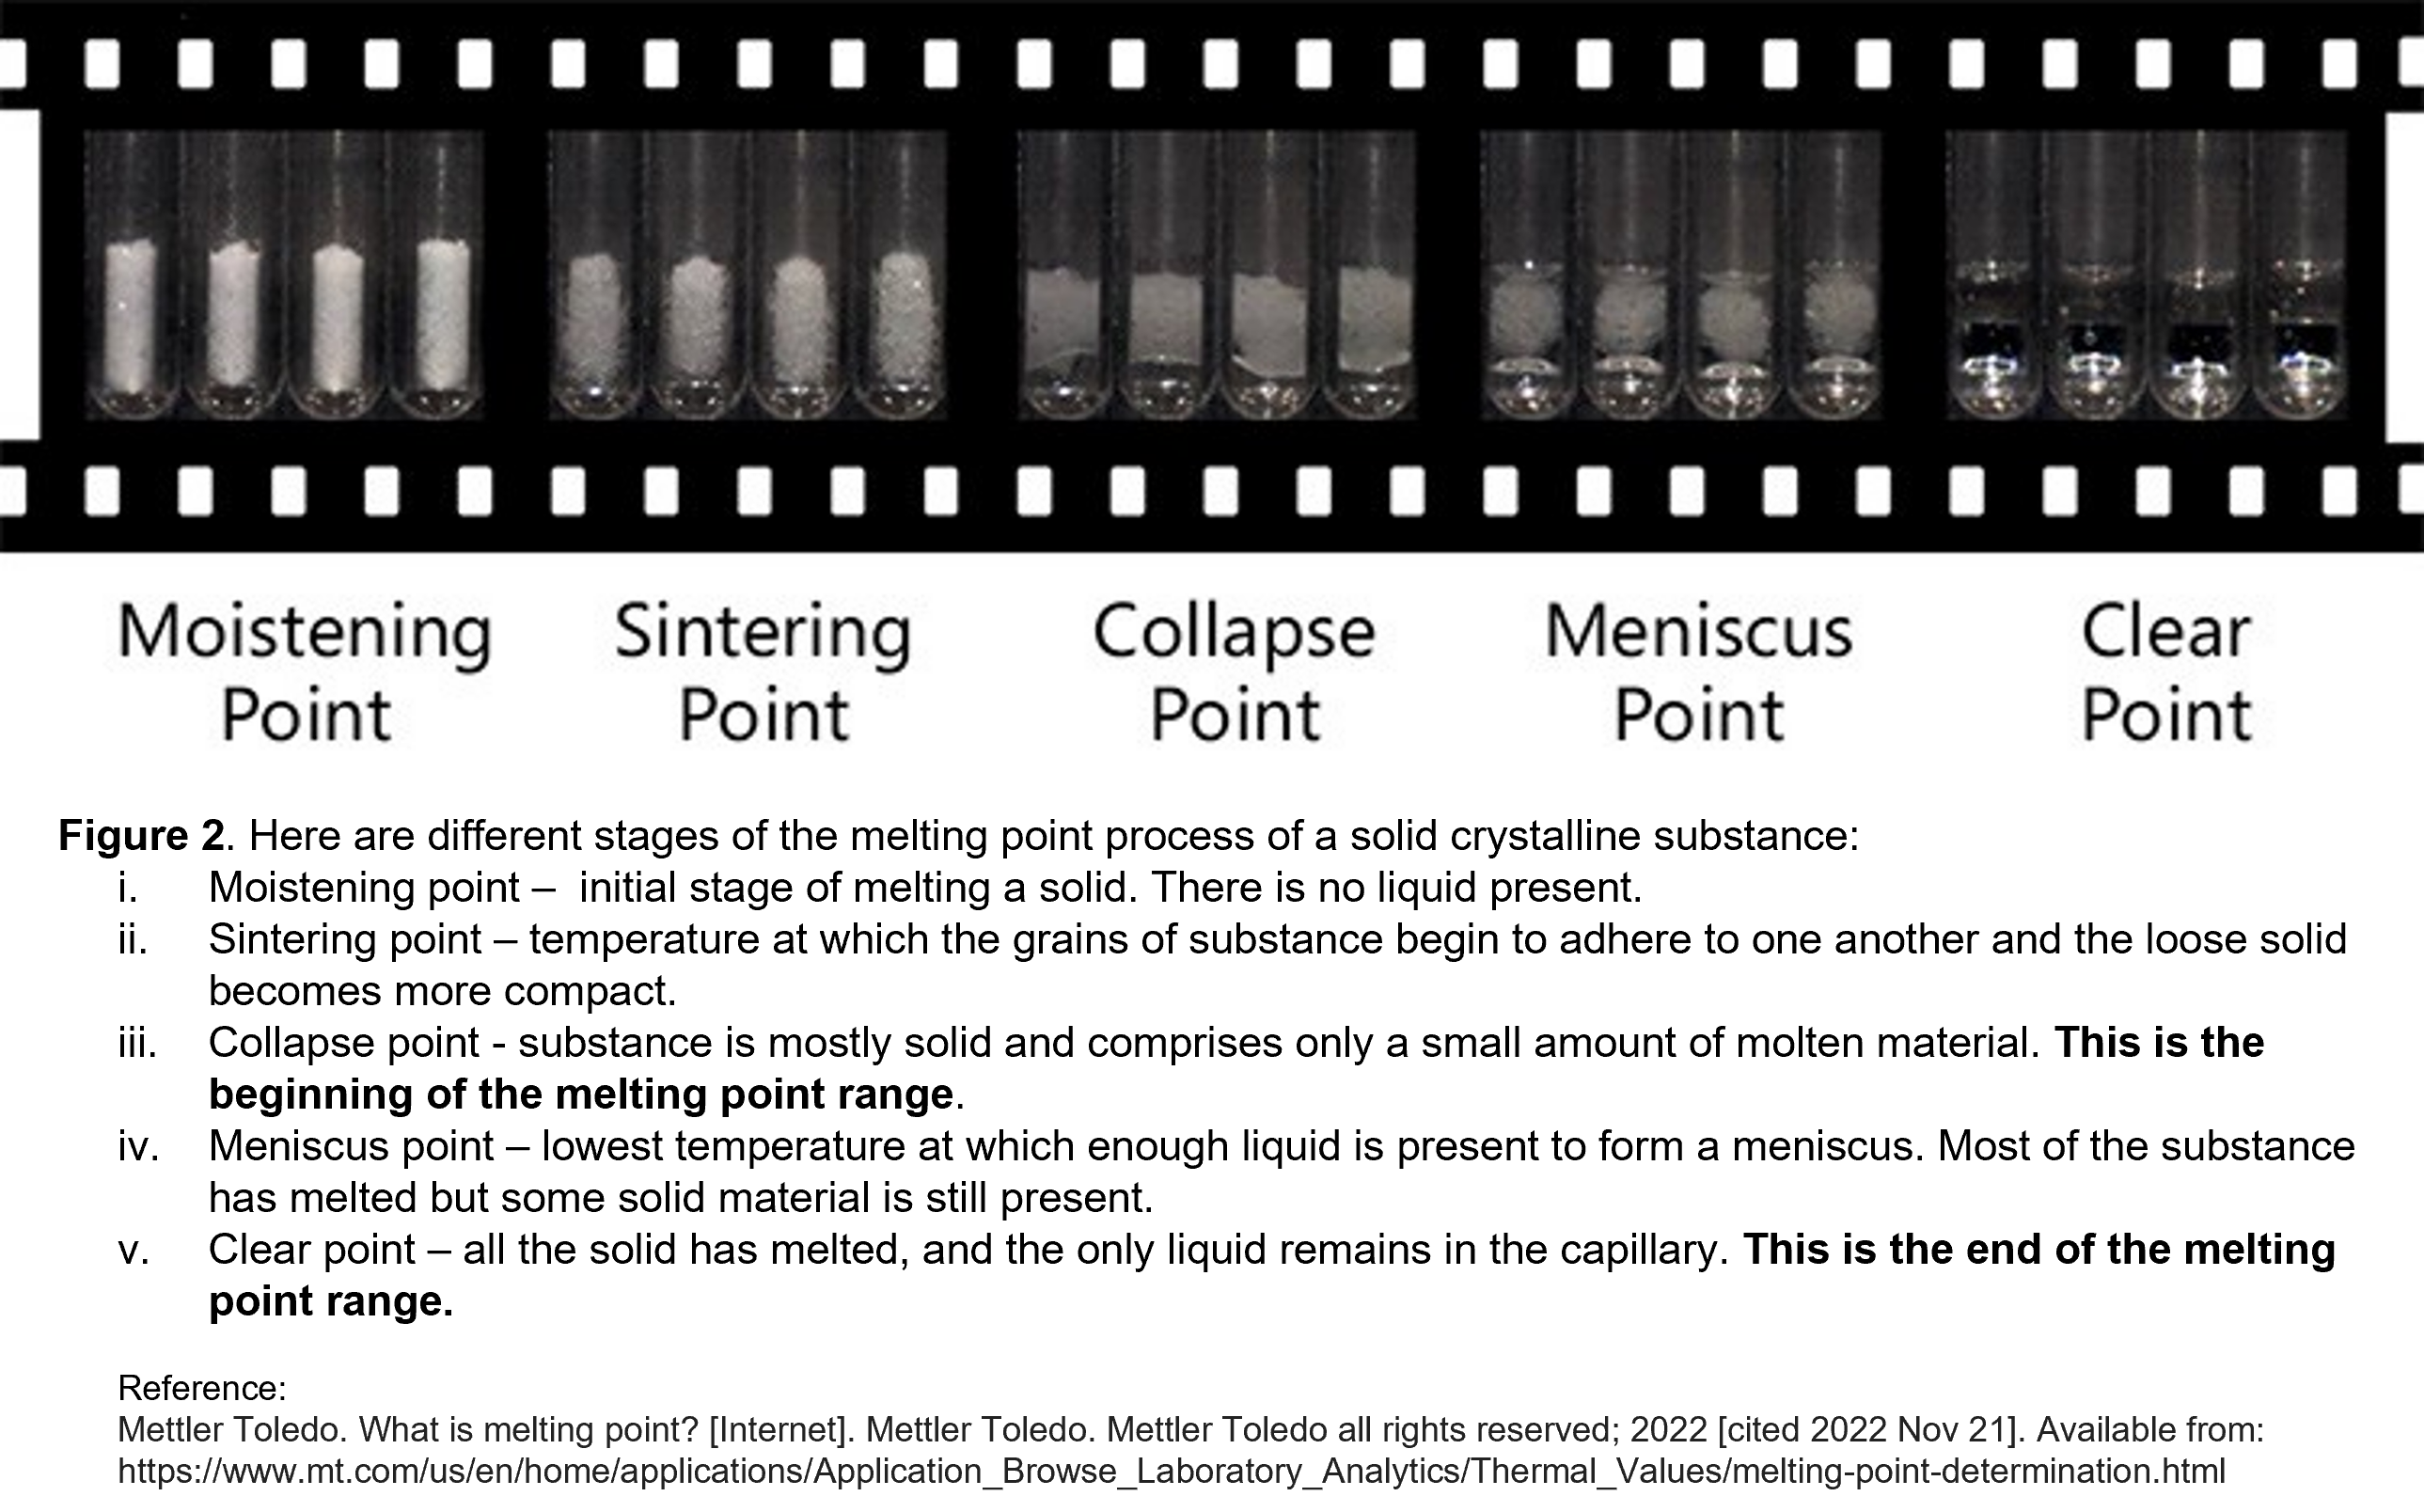
  8. Using the thermocouple, obtain the melting point of the sample noting the temperature at which melting begins and ends.  Thus, you will record a temperature interval.  The different stages of fusion may be found in Figure 2 below. 
  9. Once the melting point has been determined, use tweezers to remove the coverslips from the heating block.  Do not touch the coverslips or the heating block with your fingers as it is very HOT.  Place the coverslips into the glass waste.
  10. Place the weight on the heating block to cool it.  Cool only to about 120°C before beginning the next trial. 
  11. Do a total of two (2) trials per sample.
  12. Calculate the average of the experimental values and compare it to the theoretical value.
  13. When the measurements have been completed leave the workspace as you found it.  Clean the mortar, pestle and microspatula.  However, you may leave the ice bath at the workspace for the next team. 

Fisher-Johns Melting Point Apparatus
Figure 1A. Fisher-Johns melting point apparatus.1 B. Cutaway view of heating block showing ground crystals of the sample between two coverslips.
Reference:
  1. Cole-Parmer Canada Company. Cole-Parmer Scientific Experts [Internet]. Montréal (Canada): Cole-Parmer Instrument Company, LLC. Image, Thermo Scientific 00590Q Fisher-Johns Melting Point Apparatus, 220 VAC; 2018 [Cité 8 mai 2018]. Disponible à : https://www.coleparmer.com/i/thermo-scientific-00590q-fisher-johns-melting-point-apparatus-220-vac/0301206

Stages of melting

Analytical Method 2. Qualitative Chemical Analysis
2

Introduction

Using appropriate qualitative chemical tests it is possible to determine the functional groups present in a compound.  The qualitative chemical tests can be done relatively quickly, and, thus, are also referred to as spot tests.  These tests are designed to show a change (color change, the formation of a precipitate and/or the evolution of a gas) when a specific functional group is present. 


For easy comparison, qualitative chemical tests are typically performed under four different conditions simultaneously:
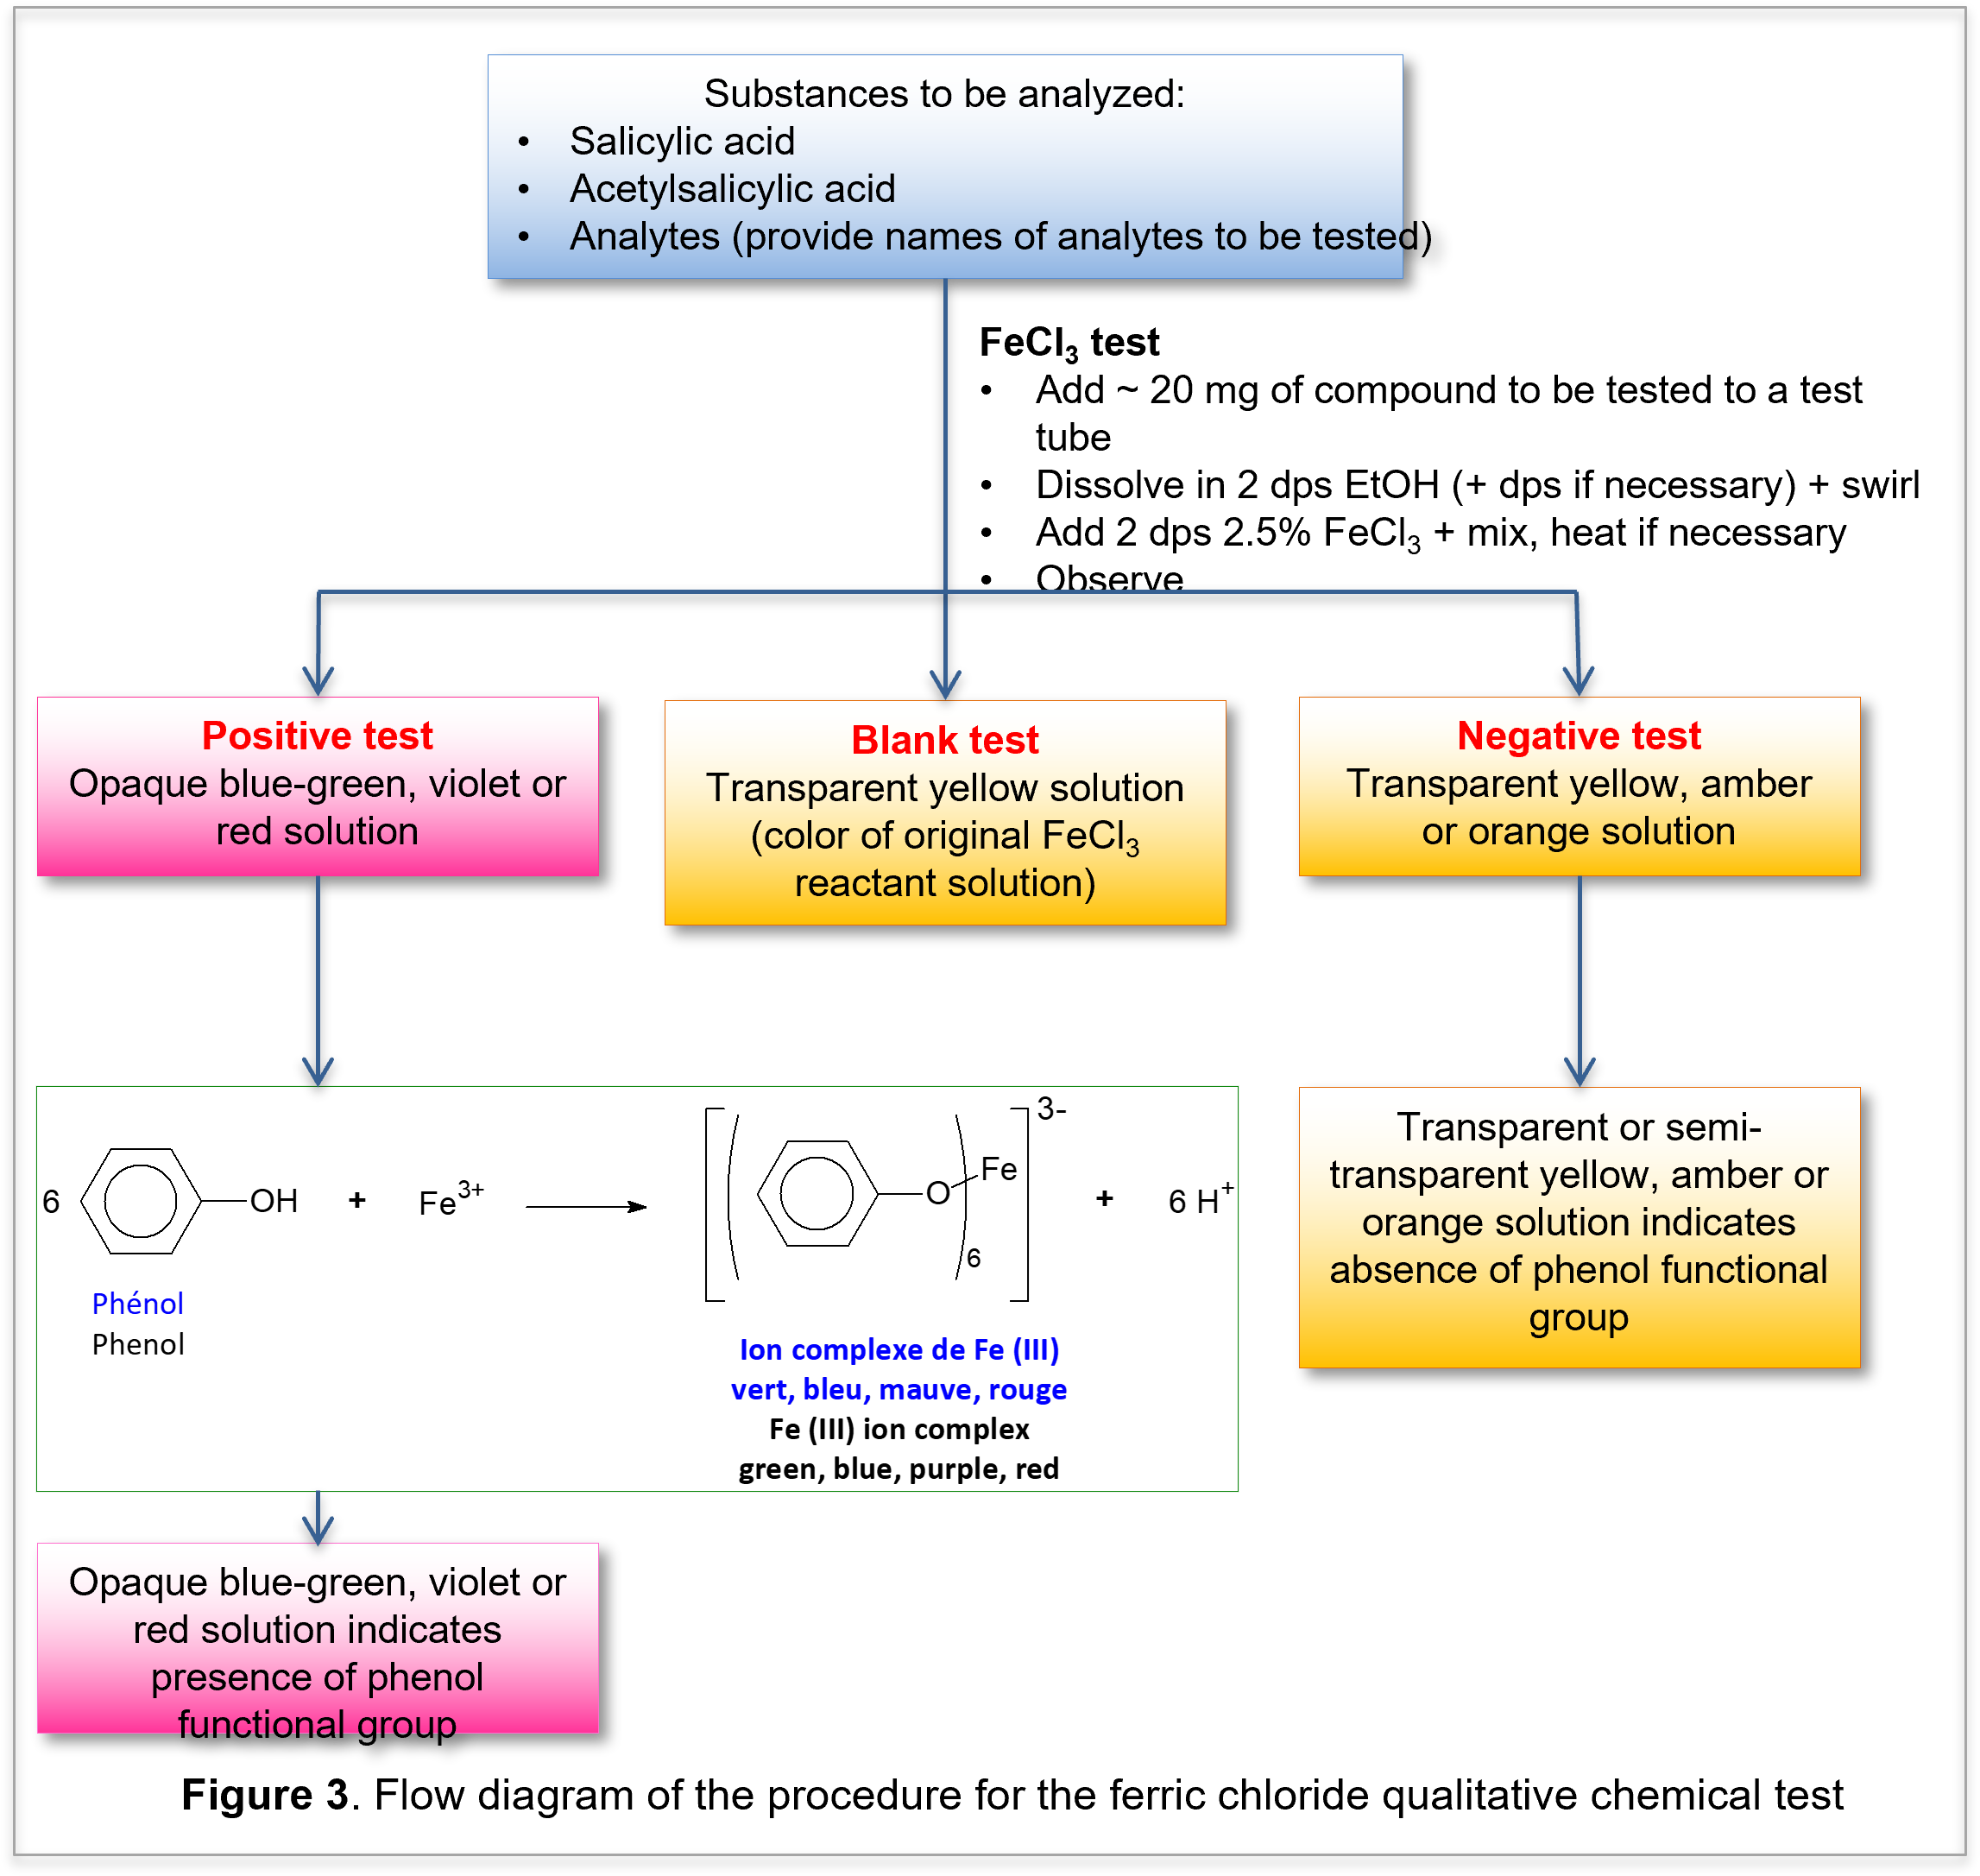
You will perform the ferric chloride (FeCl3) qualitative chemical test (Figure 3) to compare crude, recrystallized and commercial aspirin.  For the analysis you have at your disposal the compounds necessary for the positive, negative and analyte tests.
 
Ferric chloride (FeCl3) qualitative chemical test
 
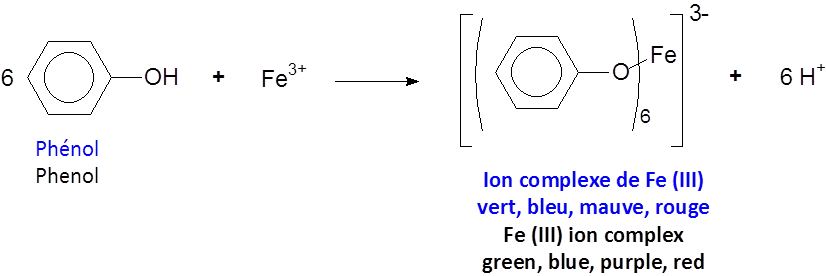
Phenols are organic compounds that contain a hydroxyl group attached to a benzene ring.  Such compounds react with ferric chloride to form green, blue, purple or red complex ions, the color of which is determined by the structure of the phenol (see reaction below and Figure 3).
FeCl3 reaction
The color of the solution may be very faint and may disappear rapidly, therefore, it is important to observe the color directly after mixing the reagents. For these reasons, it is a good idea to run a blank test that contains all the reagents except the phenol.  In addition, it is advised to perform a blank test because the ferric chloride reagent solution is yellow-brown in color. 
 
Positive test: Salicylic acid standard
Negative test: Acetylsalicylic acid standard
Blank test: Follow the procedure below omitting the substance to be analyzed
Analyte test: Crude aspirin, recrystallized and commercial aspirin (crush the commercial aspirin tablet in a mortar with a pestle and remove the outer coating)
  1. It is critical that the positive test, the negative test and the blank test be run before the analyte test to facilitate the comparison of the results.
  2. To a test tube, add ~ 20 mg, if substance to be analyzed.
  3. Dissolve the substance in 2 drops of ethanol.  If necessary, add a few more drops of ethanol to dissolve solid substances.
  4. Swirl to mix or use the vortex mixer.
  5. Add 2 drops of 2.5% ferric chloride solution and swirl to mix.  Heat in a hot water bath, if necessary.
  6. Observe the solution closely, because the color change may disappear rapidly.  A positive test is a color change from yellow (the color of the ferric chloride solution) to blue green, violet or red.
  7. Given this procedure the following flow diagram below may be prepared (Figure 3).
FeCl3 test

References

  1. Williamson KL, Minard R, Masters KM. Chapter 3 Melting points and boiling points. In: Macroscale and microscale: organic experiments. 5th edition. Boston: Houghton Mifflin; 2007. p. 38.
  2. Schoffstall AM, Gaddis BA, Druelinger ML. Chapter 28 Organic chemical analysis II. In: Microscale and miniscale organic chemistry laboratory experiments. 2nd ed. New York: McGraw-Hill Higher Education; 2004. p. 529.